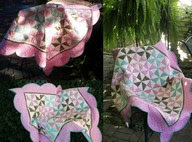
Hey, guess what! I have another pocket, or pouch to show you. It's a dragonfly pouch. This would look cute on a bulletin board, draped over a knob, or on the hanger of a displayed garment.

This is a fun one. The front and back are the shape as a half moon with a bump added for the head, as you can see. It is 6" by 4" including the bump. The front and back are felt shapes (cut 4), covered with fabric that is 1/2" larger all around (cut 2). For the front of the pocket, * one of the fabric pieces is placed with the wrong side next to one of the centered felt pieces and the edges of extended fabric are folded over the edge of the felt and basted in place on the felt side. Baste without going all the way through to the front side of the fabric. Next, another identical felt shape is stitched over the back side (the side where the fabric has been folded over and basted to the felt). It will cover the raw folded edges of the fabric. Use a whip stitch to stitch it all around the edges.* Repeat from the first *to the last* for the back piece as well.

Next join the front and back together; I used what I call the baseball stitch. Starting at one corner and going downward, I join the two together with the felt sides together using a few overlapping stitches. Start the needle on the felt side of the front piece only and coming out to the fabric side of the front piece with a 1/8" stitch about 1/4" down from the overlapping stitches. Next, I do the same stitch with the back side (1/8" stitch from the felt side to the fabric side, going 1/4" down). Repeat this stitch zigzagging all the way down, under, and up to the other corner, leaving the top open for a pocket. You can click on the picture above to get a closer look at the stitching. End with a few overlapping stitches and a knot. Bury the knot between the layers, and cut the thread.

Now we're ready for the dragonfly. The wings are made in the same way as the front and back using two felt cutouts of an elongated teardrop shape, with the tip cut off--1&1/2" by 3&1/2" , AND a fabric piece cut out 1/2" larger all the way around, for each wing. Make four wings, assembled the same as the front of the pocket * is.
Attach these four wings to the front by pinning them in place as in the picture above. Stitch wings to the front of the pocket one inch from the small end of the wing, around the end, and one inch up the other side. Repeat with all four wings.
The body is a 2" by 7" piece of felt rolled real tight, starting with one 7" side and rolling toward the other 7" side. Pin and whip stitch the edge in place. Place on the body between the wings, and note where you need to coil the end of the body to. Coil and stitch the coil together on the back of the coil. Stitch the body to the front of the pocket placing it between the wings in the center as shown, stitching both sides down to the bottom of the pouch, and stitching the coil in place.
Stitch some beads in place for the eyes.

The handle is 8" of beading attached to either side of the head bump--One end to the back right of the bump and the other to the front left of the bump.

TA-DA!


I love the curly tail and the bug eyes! It's so cute!
ReplyDelete☺ Celeste