I'm going to try to do a tutorial of sorts on this doll.
Here is the pattern.
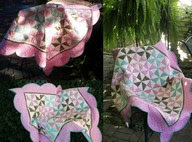
I cut the pieces out and traced around them on the doll fabric. That will be the sewing line, be sure to leave 1/2" between pieces. (You will need to trace one body, two of each leg part and two of each arm part, two feet and two hands, and finally one head back---these will be pinned to another piece of fabric on the back before sewing; after sewing on the line, leaving an opening for turning, cut them out with 1/4" seam allowance.) You will need only one face, but cut it out with at least 1/4" of seam allowance.

On the legs and arms sew from dot to dot following the arrows, and leaving the area for the gussets to be attached unsewn. Cut them out with 1/4" seam allowance. This pic below shows how the gussets are attached. Be sure to leave an opening to turn the pieces right side out after sewing, I left a 3/4" opening when attaching the gusset. Stuff them very well, but only stuff the gusset area lightly. I used hemostats to stuff them. Sew the opening closed. The picture below also shows how to attach the body parts together with buttons and very strong thread. I used carpet thread, and a doll needle. Squeeze the buttons together when tying the end of the threads together, you may need help with this. I tied the square knot between the button and the outer area of the gusset.

The back of the head pieces are sewn together down the center back, with an opening, then sewn to the face. Stuff it firmly after turning, then close the opening. The caved in area on the back of the head is where the head attaches to the neck by stitching them together.
After the body parts were all attached I added the doll hair that I bought at the hobby store. Next the face--I just used a macron pen to make the eyes and a little blush for the cheeks. My grand daughter had her sister add the face by painting it on. I'm anxious to see it.