I enjoy sewing things by hand, and this project is all by hand except for the stems.
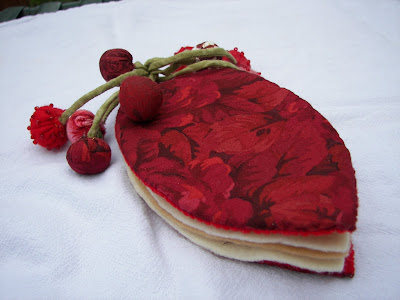
This is a needlebook, but I put pins in it too. It is fairly large for a needlebook---6&1/4" by 3&1/4", but it is large enough for my doll needles as well. I got the instructions for this out of a book at the Library. I have quite a few other projects from that book as well.
The front and back covers have felt on the inside as well as the backside of the fabric pieces. You cut two 6 & 1/4" by 3&1/4" felt leaf shapes from felt that matches the fabric (I used red), then one from fabric that has 1/2" added all the way around. Then you wrap the fabric around one of the smaller felt leaf shapes with the wrong side of the fabric next to the felt, and baste the folded over edges of the fabric on the felt side without going through to the front side of the fabric, so no stitches will show. After that is done you place the last felt piece on top of the other felt piece that has the basting on it, and do a whip stitch all around the edge. You repeat this process for the back cover.
I cut out 3 leaf shapes from neutral colored felt and then sandwiched them between the front and back covers. To hold the whole thing together I did a blanket stitch around the top point, making sure to catch all of the different layers of pages and covers. I started the stitching one inch before the point and ended one inch to the other side of the same point.
There are some 1&1/2" felt circles that are stuffed and beaded. I ran a gathering stitch around the outside perimeter of the circle, then pulled it up a little and stuffed it. I used a very strong thread for this part. Pull the thread tight and poke a stem end inside and stitch closed. Also, there are some circles of fabric that are stuffed as well. The felt circles stretch a little, but the fabric circles do not, so use a little larger circles for the fabric cherries.
For the stems I stitched 1/8" bias tubing, trimmed it close to the stitching and turned it with a spaghetti strap turner. Cut it in various lengths of 5-6". Attach a cherry to each end of all the stems but one. Fold them in half and adjust where you want the cherries to fall. One of the stems had only one cherry, and the other end has been made into a 1" loop.
Attach the folded stems just under the loop and attach to the top of the blanketstitched area of the leaf with the loop sticking up above the top of the leaf point. Ta-da! That's all there is to it.


"Sew" cute! I love anything with cherries!
ReplyDelete☺ Celeste
Oh, this is "sew" beautiful! The color is wonderful. You got the pattern out of a library book - what is the name of it? Thanks so much for planting your creative seed at Plant a Punkin Seed Party. Make sure to come back on Friday and plant another creative seed!
ReplyDeleteKristi
Punkin Seed Productions
I love sewing by hand as well - this is a great project. Well done!
ReplyDeleteAl
http://almcleary.com/blog
Kristi, I can't remember the name of it, but it had an Oriental name on it. I know that's not much help--sorry.
ReplyDeleteI like your new blog layout! Very clean and relaxing looking!
ReplyDeleteLove the new blog design! It's very pretty!
ReplyDelete☺ Celeste
You have been featured! Come grab your button and wear it with pride!
ReplyDeleteKristi
Punkin Seed Productions
That looks great! I love sewing by hand, machines are sometimes just too big and complicated :)
ReplyDeleteI love your needlecase, I'm a big fan of red. I see you've made a few lovelies from the same book and lots of gorgeous pouches too, another favourite of mine.
ReplyDelete