Friday, April 30, 2010

Apple Pocket

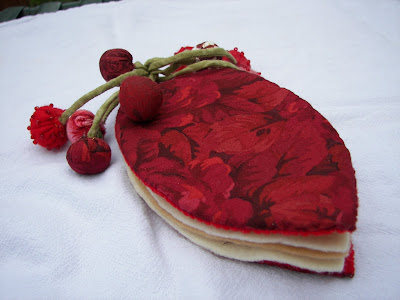
 Here is another little pocket that is fun to sew.
This is the Apple Pocket, and I hang it on the fridge.  I have been keeping my Library receipts in this, although I don't use them much since I check on line more than look at the receipts.  It's good for other things as well.


It is made similar to the Tomato Pocket, and the Cherry Needlebook.  I made three of these for my oldest daughter, Jennifer-who lives in Iowa, to keep on her fridge for her three kids.  I made one each in red, yellow, and green.  I wish I had taken pictures of them. 

The decorations are beading and embroidery on double layers of felt swirl cutouts, and a felt stem.  The stem was an oval shape that was rolled up and stitched, then embroidered and beaded.  The little balls are made like the balls on the Cherry Needlebook.  The stems are Embroidery floss (3-6 strands) that are twisted real tight and folded in half (twisted cording).  The handle is beading attached on both sides of the opening for the pocket.


Tuesday, April 27, 2010

Erin's Pillows

  Our youngest daughter, Erin and I made some big pillows for her bed at her house. 

First, we measured off 30" square on a twin sheet set and cut 6 squares.  Then she sewed around the edges leaving an opening.  Ironed them before turning, and then turning them.  Next we found and marked the center on both sides for the two covered buttons.

Covering the buttons was the next step.  Mark the circles with the template on the back of the box of buttons, and cut them out.  Then pop the button into the fabric circle with the help of the rubber button holder--that's my name for it, and snap the button back on.  I really like the last picture of the finished buttons--it's on her glass top table and you can see the reflection of her light fixture on the ceiling and the floor at the same time.

She then stuffed the pillows with two bags of fiberfill for each pillow.  She stitched the opening closed using the ladder stitch.  Using my longest doll needle and some carpet thread we added the buttons--one on the front and one on the back.  Cinching it down took both of us--her to push the two centers together and me to tie the knots.

Here all three are on her bed.

She has a knack for decorating so I must show you the rest of her room.

This was suppose to be a TV stand and she used the slots for baskets to slide in and out.  I think it looks really nice and a little less like a dresser or chest would.


Here is what Dad did while we were sewing.
He loves to read.  He also changed out her light switches in her bathroom.  Yea for the men.  They do all the scarry stuff.  Part of the time we were sewing in the dark though.

Saturday, April 24, 2010

Tomato Pocket


  I have made another little project similar to the Cherry Needlebook in the way it's made. 

This is a Tomato Pocket I use to hold my deck of cards.  (I play solitare when my hubby is playing Spider on the computer.)  This little holder keeps them together in a neat little package, and it looks nice just about anywhere.

The front and back are made in the same way as the Cherry Needlebook covers with the exception of a little more work on the front of the Tomato.  The green part was fabric covered felt that was basted on the back side then stitched to the top of the front piece. Little circles of fabric that were folded in half, then in thirds and gathered were tucked under the bottom edges of the green part before stitching down.

I stitched the front and back together with what I call the baseball stitch, leaving an opening in the top for a pocket.  I then added some beads to the center top area.  And there you have it.

For Mother's Day Ideas check out this site.

Thursday, April 22, 2010

Spring Planting Time Has Come!

Gardening time is here and I've been working outside.
 
My daughter Erin got me a turtle for Mothers Day a couple of  years ago.  Most of the moss had fallen off, so I bought some sheet moss at Walmart and held it on with fishing line, then I put in a fresh pot of Baby Tears.  Now all I need to do is water it.  This is the back side of it above.  Below is the front side, and it needs a little work on his face.

The Baby Tears plant will grow and practically cover the moss by the end of Summer.  I think he's so cute.

This year I'm going to try growing a water lily in our gold fish pond.

  It's suppose to cut down on the amount of algae growing in the pond.  I guess it blocks sunlight once it gets lily pads.  The little plastic flower is tied to a string that is tied to the bag holding the lily plant.  We need to get some black colored hose for our pump so it won't show up so much.  You can barely see the goldfish that overwintered in the pond--they did just fine even though it froze over a few times.  I think the algae  probably produced oxygen for them--I don't know for sure.  There's a  partially submerged fish spitter on the right, the birds like to jump on it to take a bath.  They bob up and down, but don't seem to care.

I potted up some bedding plants in these pots next to the little pond.  I have begonias, elephant ears, lobelia, and a yellow green sweet potato vine that will get big, because I feed them Miracle Grow liquid fertilizer---all of them. Yesterday, I planted the front flower bed, but it's not much to look at yet.  I double dug the parts that don't have perennials, or bulbs.  I also mixed in lots of spaghnum peat moss to help loosen up our hard clay soil.  I also potted up about 80 rudbeckia (Blackeyed Susan's-perennial variety) that I dug out of that bed.  I was one tired puppy last night.

I still have some plants to set out, but I'll get to it soon.  Most of these go in the back bed.  I just enjoy gardening so much that I forget to eat, which is bad because I get low blood sugar that messes me up for a few days and I just drag.

This is a close up of one of the begonias I bought for one of the concrete planters out front.  My sister is coming over for a Bible study she and I are doing---I really enjoy that too.  Right now we are doing a study on the Beattitudes.  It's Kay Arthur's book--Lord, Only You Can Change MeI highly recommend it.

Monday, April 19, 2010

Cherry Needlebook

I enjoy sewing things by hand, and this project is all by hand except for the stems.
This is a needlebook, but I put pins in it too.  It is fairly large for a needlebook---6&1/4" by 3&1/4", but it is large enough for my doll needles as well.  I got the instructions for this out of a book at the Library.  I have quite a few other projects from that book as well.


The front and back covers have felt on the inside as well as the backside of the fabric pieces.  You cut two 6 & 1/4" by 3&1/4" felt leaf shapes from felt that matches the fabric (I used red), then one from fabric that has 1/2" added all the way around.  Then you wrap the fabric around one of the smaller felt leaf shapes with the wrong side of the fabric next to the felt, and baste the folded over edges of the fabric on the felt side without going through to the front side of the fabric, so no stitches will show.  After that is done you place the last felt piece on top of the other felt piece that has the basting on it, and  do a whip stitch all around the edge.  You repeat this process for the back cover.
 
I cut out 3 leaf shapes from  neutral colored felt and then sandwiched them between the front and back covers.  To hold the whole thing together I did a blanket stitch around the top point, making sure to catch all of the different layers of pages and covers.  I started the stitching one inch before the point and ended one inch to the other side of the same point.
  
There are some 1&1/2" felt circles that are stuffed and beaded.  I ran a gathering stitch around the outside perimeter of the circle, then pulled it up a little and stuffed it.  I used a very strong thread for this part.  Pull the thread tight and poke a stem end inside and stitch closed.  Also, there are some circles of fabric that are stuffed as well.  The felt circles stretch a little, but the fabric circles do not, so use a little larger circles for the fabric cherries. 

For the stems I stitched 1/8" bias tubing, trimmed it close to the stitching and turned it with a spaghetti strap turner.  Cut it in various lengths of 5-6".  Attach a cherry to each end of all the stems but one.  Fold them in half and adjust where you want the cherries to fall.  One of the stems had only one cherry, and the other end has been made into a 1" loop.
 
Attach the folded stems just under the loop and attach to the top of the blanketstitched area of the leaf with the loop sticking up above the top of the leaf point.  Ta-da!  That's all there is to it.

I joined some Linky Parties here, here, here,  here and here.


Friday, April 16, 2010

A Quilted Bag and Blanket

                     I made a small diaper bag for this little girl I babysat for.
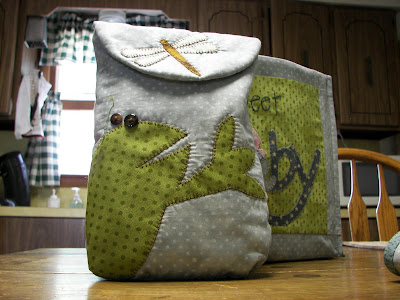
It is made of flannel; I pieced the different fabrics together then quilted it with batting and backing.  Lastly, I cut it out and sewed it together.  Her momma liked it so much whe wanted to carry it for a purse.  (I liked it too, and kind of wanted to keep it.)  For the trim I knitted some white eyelash yarn to stitch to the bag.
 
I also made her a blanket with satin binding.
Here is the little sweetie I babysat.

I just love babies.

Go check out these cool sites here and here and here and here.

Thursday, April 15, 2010

Now, This Is More Like It!

                          We, my hubby and I, have gone from cold winter days and doing this---


To  warm Spring days with these beautiful flowers coming up in our yard.


My sister, Donna and I are walking two miles in our neighborhood just about every day.  The Lilacs smell so good now--I just love it.  I'm doing a lot of deep breathing; I really love spring time--Isn't God good?!  I can't wait to start planting flowers--it's very close to that time.  I'm so excited.  I usually don't get started til the first of May, but I don't know if I can wait that long.  I might plant a bed or two early this year.
Well, I talked myself into it, today I'm going to buy some bedding plants.

Monday, April 12, 2010

Sophia's Quilt

Well, here is our last grandchild, #8---Celeste's sweet little baby girl (#5 for her), Sophia, or Sophie, or Soapy Feet as her big sister, Evie, sometimes calls her....

Above are pics that Erin took a couple of months ago....and below are her current pics from Celeste...

Ain't she a cutie?  I just want to kiss her sweet little cheeks.  Such a sweet little baby, and so happy too.
When her momma was still carring her I made some little shoes for her.
The key word being "little".  She wasn't  able to wear them.  She could have worn the larger pair, but her toes would have been curled up, so maybe someone in the family will have a baby girl that's a little smaller.  She couldn't wait to get here and was born in the suburban with the whole family on board.  That's how she got the name Sophia--they pulled in front of a Mexican Restaurant in the middle of the night on the way to the hospital, and she wasn't waiting any longer--they like sopapillias (I think that's how it's spelled) so--Sophia is her name.  Here is the quilt I made her...
I named it Pink Peppermint Twist, but this one doesn't have a label yet---I'm so bad.
Here is cute little Sophie playing on the quilt.
Sophie on Momma and Daddy's bed.
Precious!

Go chek out The Girl Creative.


.

Saturday, April 10, 2010

Grandbaby Sewing


While I'm waiting on some more pics from our youngest daughter Erin, of our latest grandbaby, (Celeste's fifth child) Sophia---I will show you some of my obsessive sewing for an expected grandbaby.

Getting started with applique here and some embroidery.
I made a few bibs.


A diaper stacker.

A small tote for a diaper or two and some wipes.

A diaper bag with a small pacifier bag.

Here's a close-up of the small bag.

A changing pad.

Sometimes I get carried away; I get on a roll and can't stop.  I have no idea what comes over me.
The table runner underneath it all on the table was a gift made by our oldest daughter, Jennifer.  She likes to quilt like I do.
And, check out The Girl Creative.